 FA+
FA+
18855
Views
Views
852
Favorites
Favorites
Category
Artwork (Digital) / All
Species Cheetah
Gender Female
Size 1280 x 960
File Size 993.2 kB
★
More from ruaidri


Hey, that fur addon is live!
EDIT: The addon featured in this post is now long since deprecated. I'm going to leave the text here for historical reasons I guess, but if you're looking to pull off this look today, use my node setup instead: https://www.furaffinity.net/view/51844134/
Y'all may remember my recent plea to the community for help with a problem I've been having with Eevee's fur lately, and a suggestion for a possible fix if someone had the knowledge how to implement it; well, Sentharn stepped up to the plate in a huge way and made it a reality! (Actually a lot of you all tried to help out and thank you so much for that! Sen just happens to be the one who brought it to the finish line.)
[Link removed]
This is an addon for blender that allows you to transfer the normals from your base character mesh to the fur, resulting in a considerably smoother look. This is a common practice in video game and anime styled characters when using mesh based fur, but blender natively had no way to do this transition to particle based fur. Thanks to Sen, now it does!
I'm not saying this is strictly better, if you don't like it, you definitely don't have to use it, but it does solve a lot of the problems I had with eevee's native fur (hairs changing colour depending on the angle you look at them, having to use massive amounts of hairs to cover an area, etc) and personally I really enjoy the smoother look it gives characters. Feel free to give it a try! Another advantage is this method of rendering fur can use far fewer, thicker hairs and runs with shadow casting disabled which makes renders run dramatically faster, more than making up for the few extra seconds the script itself adds.
The link to the addon explains how to use it, but here's some stylistic advice you can play around with based on my early experimenting:
For the smoothest results, consider disabling AO, and turning off the shadow casting of your hair material.
Best used with just diffuse materials anywhere you want fur; trying to add in shine and other effects can have strange results (but do play with it if you want, and let me know if you find anything that looks nice!)
To really blend the hairs in with the surface, mix your final hair material in with a transparent material using a curves info > intercept node, and use a colour ramp to tighten up the transition so just the very base of the hairs are transparent. This makes the hairs kind of melt into the surface rather than suddenly hard stopping
Following the above advice, the results can be almost a little too smooth, so you can add back in some fur texture by mixing in a lighter version of your fur colours, once again using a curves info > intercept node so it only applies to the tips, and using a vertex group to control where this lightening happens. I find it works best to add it to any really long clumpy hair to help it stand out a bit, but in this example I also added a little to the cheetahs belly to make it look fuzzy. Also, this method of fur rending picks up the colours underneath extremely well, so just manually painting in some stylized fur effect can also give good results. Play with it and see what you like best!
Massive super duper thanks to Sentharn for allowing me to finally play around with this style! And now you can too. And feel free to show us if you make anything cool using it! I think we'd both like to see what comes as a result of this new method.
Character belongs to Pojodan, I just happened to have recently updated their model to fit the new style so it was as good an example to use as any!
Y'all may remember my recent plea to the community for help with a problem I've been having with Eevee's fur lately, and a suggestion for a possible fix if someone had the knowledge how to implement it; well,
Sentharn stepped up to the plate in a huge way and made it a reality! (Actually a lot of you all tried to help out and thank you so much for that! Sen just happens to be the one who brought it to the finish line.)[Link removed]
This is an addon for blender that allows you to transfer the normals from your base character mesh to the fur, resulting in a considerably smoother look. This is a common practice in video game and anime styled characters when using mesh based fur, but blender natively had no way to do this transition to particle based fur. Thanks to Sen, now it does!
I'm not saying this is strictly better, if you don't like it, you definitely don't have to use it, but it does solve a lot of the problems I had with eevee's native fur (hairs changing colour depending on the angle you look at them, having to use massive amounts of hairs to cover an area, etc) and personally I really enjoy the smoother look it gives characters. Feel free to give it a try! Another advantage is this method of rendering fur can use far fewer, thicker hairs and runs with shadow casting disabled which makes renders run dramatically faster, more than making up for the few extra seconds the script itself adds.
The link to the addon explains how to use it, but here's some stylistic advice you can play around with based on my early experimenting:
For the smoothest results, consider disabling AO, and turning off the shadow casting of your hair material.
Best used with just diffuse materials anywhere you want fur; trying to add in shine and other effects can have strange results (but do play with it if you want, and let me know if you find anything that looks nice!)
To really blend the hairs in with the surface, mix your final hair material in with a transparent material using a curves info > intercept node, and use a colour ramp to tighten up the transition so just the very base of the hairs are transparent. This makes the hairs kind of melt into the surface rather than suddenly hard stopping
Following the above advice, the results can be almost a little too smooth, so you can add back in some fur texture by mixing in a lighter version of your fur colours, once again using a curves info > intercept node so it only applies to the tips, and using a vertex group to control where this lightening happens. I find it works best to add it to any really long clumpy hair to help it stand out a bit, but in this example I also added a little to the cheetahs belly to make it look fuzzy. Also, this method of fur rending picks up the colours underneath extremely well, so just manually painting in some stylized fur effect can also give good results. Play with it and see what you like best!
Massive super duper thanks to
Sentharn for allowing me to finally play around with this style! And now you can too. And feel free to show us if you make anything cool using it! I think we'd both like to see what comes as a result of this new method. Character belongs to
Pojodan, I just happened to have recently updated their model to fit the new style so it was as good an example to use as any!
Category Artwork (Digital) / All
Species Cheetah
Gender Female
Size 1280 x 960px
File Size 993.2 kB


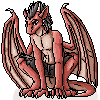


I wouldn't hate the usual fur method quite so much if it didn't have so many problems. The big one for me is the way it changes colour depending on the angle you're looking at it, leading to some really unpleasant patchiness in some poses. There was just no way to control it. At least I have some control over where it looks textured and where it doesn't now!


Just so it's clear, the modeling itself (the sculpt and such) isn't the hard part. The rigging, the hair applications, whatever you're going to use for gravity (Blender it's a switch, but you still have to understand what it's going to do) and any clothing/mods/patters/etc you're planning are the much harder parts. Though, maybe you could do a deal with Ruaidri for their rigging to go into your models once you make them? :) (Just for clarity, I'd strongly suggest using Daz Studio as the baseline at least. They've standardized the male and female models, and you can furry-ify them without too much difficulty. They've got a standard rig structure set, so if you do end up using the Genesis 8 or 8.1, there are already literally hundreds of pose assets you can buy for cheap (when the sales are running, which is near constantly) and use. Might make things a bunch easier for you, even if you just use Daz to grab the baseline male/female models and then import them to Blender and go from there. The Blender bridge from Daz is free and is relatively robust now.)

Ooh! Thanks for the heads up, I'm definitely taking notes on what I'll need down the line so this is pretty helpful! Just been taking things one step at a time, there's some other simple tutorial videos I want to try out as well for making a bunny and frog just so I can get used to how things work. The last time I had touched a 3d program was the old Milkshape program, which was pretty long ago!
No worries! For the most part, my experience with the rendered art community has been very positive. Folks want to help, rather than guard some 'trade secret' like their livelihood depends on it. I'm only too happy to pay it forward in these circumstances -- I LOVE rendered art and Ruaidri is one of my CGI heroes (I just wish they'd do a lot more M/m artz, but I'll take what I can get happily :) ). Give a once-over on https://Daz3D.com/store to see what I mean about their library of stuff. There are libraries out there of assets for sale and for free, certainly, and Daz is just one more. But again, having almost every human(oid) and even some furry figures already made and ready to go can REALLY facilitate you getting down to what's important for you. There's nothing at all wrong with wanting to figure things out from the ground up, and Blender is great for that too. Daz also has a rather robust creation capability. Just for my own money, it's more about getting me to where I'm able to start rendering sooner than later, so having the figures, poses & expressions, wardrobe, settings/props, and lights/backgrounds/extras only a few clicks away is a lot more freeing for what I'm doing. Or, rather, wanting to do once I get a non-broken down main rig. :)
Hell, there's a producer that makes Photoshop brushes of a huge variety of 'effects' for your post-work if you want. Literally dozens of themed brushes, such as dirt/grit, broken glass, lightning/power effects, underwater.... Again, there's just a paradise of tools for you to be able to do ... well, whatever you want.


One key improvement is that it's reliable enough for artists to fake whatever impact they feel is missing. Like if seeing that chest floof is crucial, the previous contrast can be made apparent with very slight tweaks to that region alone, without risking any oscillating ocelots.
You might also be able to make things fuzzier by having fewer hairs.
You might also be able to make things fuzzier by having fewer hairs.


i get the motivation, but honestly this makes the fur look even less realistic.
so it's sort of swung from odd grouping and odd shaft behavior all the way to borderline cell shaded cartoon-y look.
as far as the colors changing based on where you look at them from, well... that's actually how fur works depending on the colors and undercoat.
hair is just a shaft of keratin after all, unless it has a really deep or high pigment, the shaft will be partially light transmissive and this often will shift the color slightly in the right light or at the right angle.
i know exactly why it looks wrong to a lot of artists with the whole perfectionist eye/thing a lot of them have but it being slightly imperfect color wise is exactly how hair often behaves in real life.
now if there was an even blend between the original method and the new plugin, say to keep the actual fur texture while using the plugin to remove/blend away the odd fur groupings and even those oddities out, then i think that would be a perfect solution.
You say that it makes it look less realistic like that's a bad thing! Realism isn't the end goal of all artists, and for me the fact that it's less realistic is an upside. I like stylized art; if I wanted realism I'd look at a photo. :P
As for the changing colours, I agree that real hairs would do that to a degree, but these weren't doing it realistically. They were just going nearly full black when viewed from certain angles, not great. Also since they're 2D, they tend to disappear from certain angles as well, which also looks bad when they're not as well blended in. Eevee's fur just has problems, that's all!
As for the changing colours, I agree that real hairs would do that to a degree, but these weren't doing it realistically. They were just going nearly full black when viewed from certain angles, not great. Also since they're 2D, they tend to disappear from certain angles as well, which also looks bad when they're not as well blended in. Eevee's fur just has problems, that's all!
well, not saying it's a bad thing necessarily but, like i said this almost looks like it's not even fur anymore but a cell shaded solid mesh with an almost paint brush stroke like texturing in most places; the only places that still look like fur are all the edges.
so not being realistic is perfectly fine but again, like i said feels like you went from one extreme straight out to the other with this, a middle ground of some kind seems like it would be perfect to get the benefit but still keep it looking like a furred model instead of a cell shaded mesh in most places.
not trying to rank on your stuff at all, just seems like this was a bit of an over correction in some ways.
as for the black coloring, i wasn't aware that is what you were seeing. i don't work with blender at all so really nothing to draw from as far as specific issues with it's rendering engine, more often than not i use 3DS max and a spattering of other modeling tools for mesh/CAD design and then maya for actual rendering.


Super cool. This community, and particularly Sentharn in this case, rocks!
Sentharn in this case, rocks! 


fml there was a bug lol
please tell me https://www.furaffinity.net/view/48047370/ works better and doesn't completely fuck up the fur
please tell me https://www.furaffinity.net/view/48047370/ works better and doesn't completely fuck up the fur
Just did a quick before/after test and actually, that does look quite a bit nicer! I didn't really notice it until you pointing it out here, but the shadows were a bit stark in the previous version, they're a lot smoother and more natural looking now. Very nice! Thanks man. :D


Shouldn't have to do anything in particular to use the addon, should be pretty plug and play. I've been using it for months so it definitely works in general. :P If it's doing literally nothing I'm honestly not sure what to say aside from give the "how to" section another close read and see if you missed anything... If you still haven't got it after that I'll try to help but I'm a little unsure as to why it wouldn't be working!
I think this part confuses me the most.
"Set up the shader using the node group above to use your encoded normals instead of generated normals. Consider doing the same for the body shader"
As I tried to follow what the image shows however it doesn't show what some nodes are suppose to be connected to.
"Set up the shader using the node group above to use your encoded normals instead of generated normals. Consider doing the same for the body shader"
As I tried to follow what the image shows however it doesn't show what some nodes are suppose to be connected to.
So, you want the "vc_normals" attribute connected through the vector math nodes (first multiply by 2, then subtract .5), as the picture shows, and then you simply plug the output of that into the "normal" socket of any materials used in the body and fur of the character. So if you're just using a single principled BSDF, plug it into the normal socket of that. If you're combining a bunch of materials, plug it into all of them. Pretty much anything with a normal input, unless you've got some artistic reason to do otherwise.
Keep in mind, it'll only update when you render a frame, or manually press the "encode normals" button in the panel that the addon added, so you might not see much happen until you do that.
Keep in mind, it'll only update when you render a frame, or manually press the "encode normals" button in the panel that the addon added, so you might not see much happen until you do that.
Honestly, the addon is a lil' glitchy anyway, and it can be a bit hard to use. I'm thinking it'll be possible to do this same thing with geometry nodes after the next blender update in a month-ish, and I'll probably end up making a guide on how to do it at that time that'll maybe be a little easier to follow, so maybe check back in then and give it another try. :P

Oh, that's long been deprecated at this point. It's been replaced with a geometry nodes group now: https://www.furaffinity.net/view/51844134/
A little fiddly to work with, but much less glitchy and problematic.
A little fiddly to work with, but much less glitchy and problematic.
Comments